Sales templates are used to customise the appearance of your invoice, quote and statement PDFs. This gives you a space to communicate your brand to your customers.
For example, you can add a business logo and choose the business details you want to show at the top of your PDFs. You can also change the title of the document, hide information you don't want, reorder or rename it. You'll see a preview of how the invoice will look for customers which is automatically updated with your changes.
Set up as many sales templates as you like and choose the one to use when you view, print, download or send an invoice, quote or statement. If you usually use the same template, you can set it as the default one to use each time.
Payment details
Your accepted payment options are shown in the footer of your invoices, quotes and statements - find out how to set these up.
Before working with sales templates, it's a good idea to check that your business details and customer address details are up to date – this information appears automatically on your customers' invoices, quotes and statements.
Using AccountRight?
If you're accessing an AccountRight company file in a web browser, you can use your existing AccountRight desktop templates when emailing or printing transactions. You can edit these templates in your AccountRight software.
Create a sales template
1. Start a new sales template
Click the settings menu (⚙️) and choose Sales settings.
Click the Templates tab.
Click Create template. A PDF preview of the template is shown so you can see the effect of your changes using the settings on the left.
On the Template options tab:
Enter a Name for the template.
Select the option Set as default template if you'd like to use this template for all your sales documents. You can choose a different template when you print or send an invoice, quote or statement.
2. Add a logo or header image
Adding a business logo or full width header image to your sales templates lets you communicate your brand and business details on your invoices, quotes and statements.
In the Design section:
Upload a logo or header image. You can upload up to 4 logos and choose the one you want to show on your invoices, quotes and statements. Also choose the logo size and whether you want it aligned left or right.
Choose the Feature colour (the colour of the line separating the upper and lower parts of the template) and Header text colour (the colour of your business name).
Turn on the option for Windowed envelope address if you want the customer's details positioned so they display in standard windowed envelopes.
3. Add your business details
Choose what information you want to add to let customers see who the invoice is from. In the Content section:
(Invoice templates only) If you want to change the invoice title from Tax invoice, click Edit name and enter your invoice title.
If you’re registered for GST, you should use Tax invoice for the invoice title (the default invoice title will be Tax invoice). If you’re not registered for GST, the invoice title should not include Tax invoice – you must issue standard invoices (the default invoice title will be Invoice). Visit this ATO website for more information or consult your accounting advisor if you’re not sure.
Select the business details you want to show on your invoices, quotes and statements. These details come from your Business details page. If you need to add or update these details, click Update your business details.
Turn on the Add terms and conditions option to enter your business's terms and conditions. These will show on a separate (last) page for your invoices, quotes and statements.
To preview the terms and conditions, open an invoice, quote or statement and download the PDF preview using this template.
4. Choose what column information to display
Remove any clutter and only show the sales information you and your customers want.
In the Table Display section:
Choose the invoice’s Field Layout (Services and items or Services).
Hide a column by turning off the purple tick option on its right.
Rename a column by clicking the pen icon and entering your column name.
This only changes the template column names, not the names of the fields the columns are referring to. For example, if you change the Item ID column heading to Item No., the item field it’s referring to will still be called Item ID.
Reorder columns by clicking and holding down your mouse on the dots on the left of a column heading and moving it up or down. See these options in action:

To undo any changes, click Reset columns.
When you're happy with your template, click Save.
Edit or delete a sales template
If you're accessing an AccountRight company file in a web browser, you can only edit your AccountRight desktop templates in your AccountRight software.
Click the settings menu (⚙️) and choose Sales settings.
Click the Templates tab.
Click the ellipsis button (...) for the template and choose either Edit template or Delete.
If you're editing a template, make your changes (see Create a new template above) and then click Save.
If you're deleting the template, click Delete to the confirmation message.
Set a default sales template
Using AccountRight in a web browser?
If you're accessing an AccountRight company file in a web browser, you can't set your existing AccountRight desktop templates as default templates when working in the browser. You can still select these templates when emailing or printing transactions.
Click the settings menu (⚙️) and choose Sales settings.
Click the Templates tab.
Click to open the template you want to set as the default.
Under Template options, select the option Set as default template.
Click Save. This template will now be selected by default when you print or email invoices and quotes, but you can choose a different template if you like.
AccountRight comes with a set of invoice form templates which are used when printing or emailing PDF invoices. And it's easy to change these forms to add your own personal touch.
By default, business details entered in the Company Information window (Setup menu > Company Information) will appear on your invoices. This includes your company name and contact details:

You can add your business logo and a 'how to pay' section, or make your invoices stand out with a splash of colour. It's up to you.
Take a look at this quick overview:
You can use one invoice form for all your sales or have separate forms for invoices, quotes and orders. You can also create different versions of an invoice form depending on what you're selling or who you're selling to.
OK, let's step you through it.
To customise an invoice
Go to the Setup menu and choose Customise Forms. The Customise Forms window appears.
Click the Invoices tab on the left.
Click the type of invoice form you want to customise (Service, Item, Professional, etc.). The forms for that invoice type will be listed.
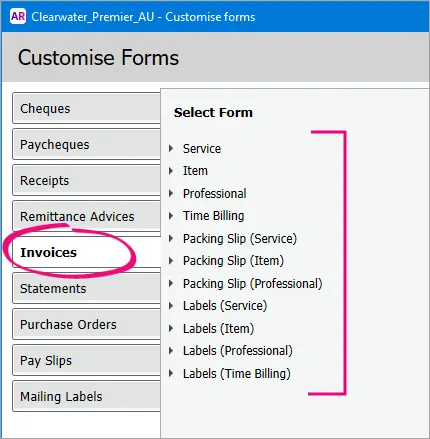
Choose the correct form
Make sure you're customising the correct invoice form for your needs. For example, if you use the Service layout when entering an invoice, customise a Service invoice form. Also, choose a tax inclusive or tax exclusive form to reflect how you charge customers GST.
Select the form you want to customise then click Customise. The form opens, ready to be modified.
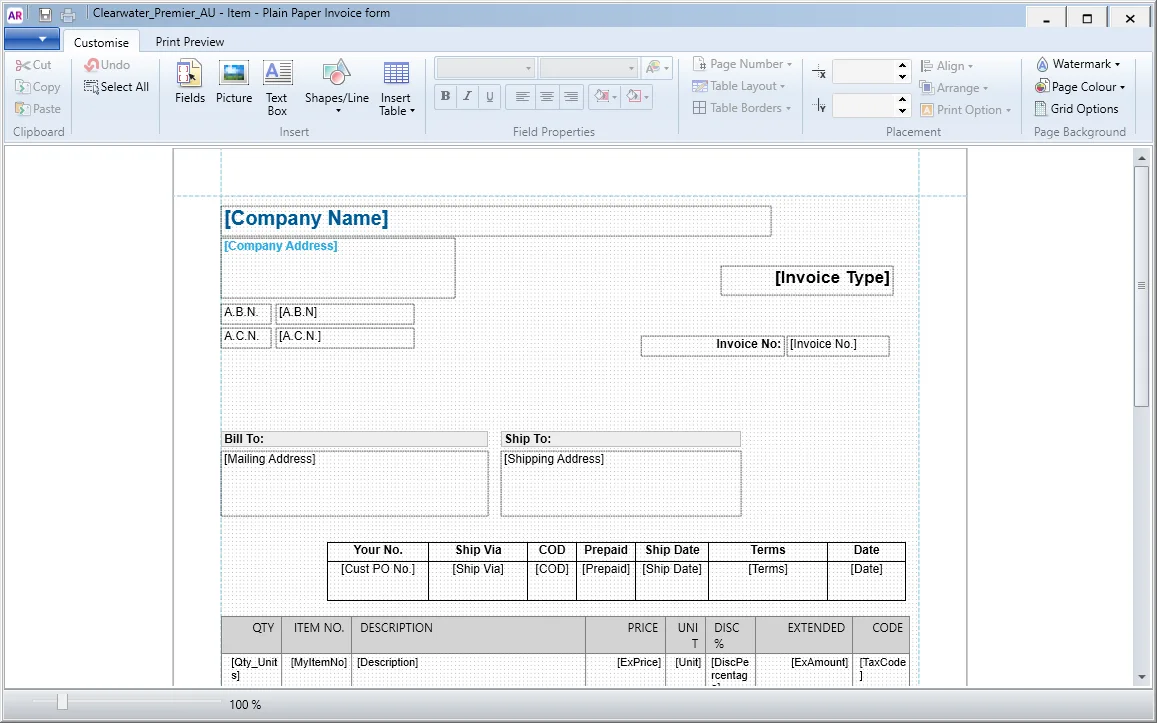
Customise the form to suit your needs:
Set up the page first
We recommend setting your page margins, orientation and page size first (show me how). Otherwise, changing this later can throw out any other customisations you may have made.
To set page margins, orientation, size, or set a background or watermarks, see Set the form size and background.
To add a business logo, letterhead, or another image, see Add pictures and shapes to forms.
To change which information is shown on the form, see Add text and fields to forms, and Add tables to forms.
For reference, see Fields and columns you can add to forms.To arrange your form, and move around fields and images, see Editing form elements.
To preview your form, click the Print Preview tab.
When you've finished customising your form, click the Save button (top-left corner). The Save Form As window appears:
Enter a name and a description for the form.
Click Save then click OK to the confirmation message.
To close the form, go to the File menu and choose Exit. If prompted to save again, click No.
The Customise Forms window reappears. Your customised invoice will be listed.


To add direct deposit banking details to your invoice
Direct deposit is a popular payment option which lets your customers pay directly into your bank account. In Australia, the New Payments Platform is making this even easier.
Here's how to add banking details to your invoice form.
Go to the Setup menu and choose Customise Forms. The Customise Forms window appears.
Click the Invoices tab on the left.
Select the form you want to use then click Customise. The form opens, ready to be modified.
Click Text Box in the toolbar.
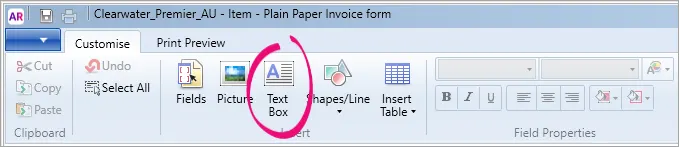
In the applicable place on your form, drag a box that's large enough to include your payment instructions.
Double click the text box and type your payment instructions, for example:
For Direct Deposit:
BSB: 013000
Account: 12345678
Payment Reference: Invoice number or customer name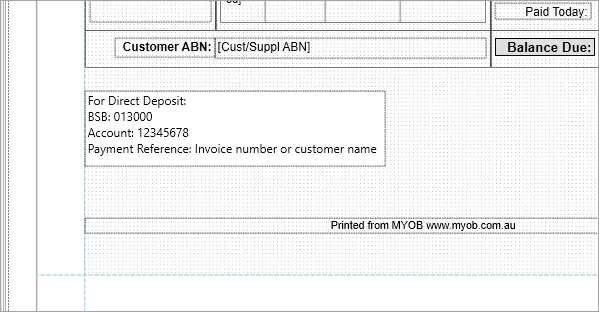
Using bank feeds?
To help make it easy to identify customer payments coming through in your bank feeds, encourage your clients to include additional details in the payment, such as their name and invoice number.
You can resize the text box, or format the text size, font and colour using the options in the Customise tab.
Click the Print Preview tab to check how the new section will look.
When you're done, click the Save button (top-left corner).
If prompted, enter a name for this customised form then click Save then click OK to the confirmation message.
To close the form, go to the File menu and choose Exit. If prompted to save again, click No.
Repeat this process for any other invoice forms you want to add your payment details to.


To add payment terms to your invoice
The credit terms that appear on the top of a sale transaction in AccountRight can easily be added to your customised invoice.

Here's how to do it:
Go to the Setup menu and choose Customise Forms. The Customise Forms window appears.
Click the Invoices tab on the left.
Select the form you want to use then click Customise. The form opens, ready to be modified.
Click Fields. The Insert Fields window appears.
On the Data Fields tab, select the Terms field and choose a display option (appear on every page, appear at start of form or appear at end of form).
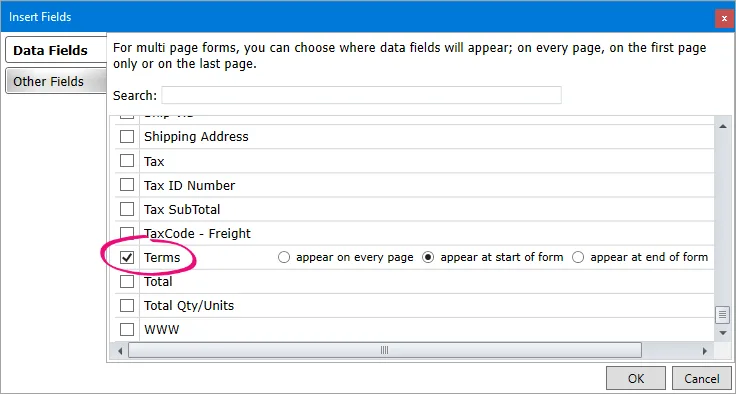
For a description of each data field you can add, see Fields and columns you can add to forms.
Click OK. The Terms data field appears on the form.
Move the data field to the required position by clicking and dragging it.
(Optional) Add a text field which states "Terms:" (or similar) next to the Terms data field.
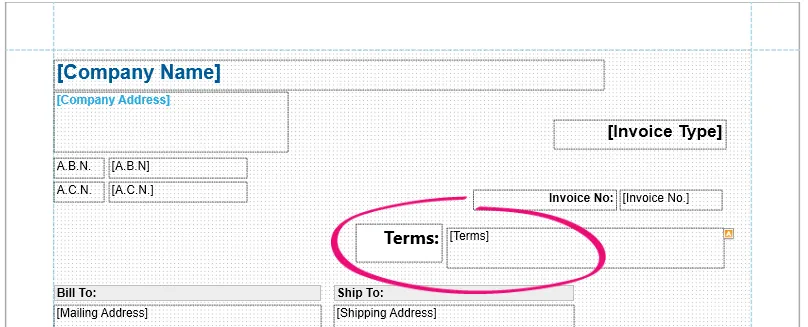
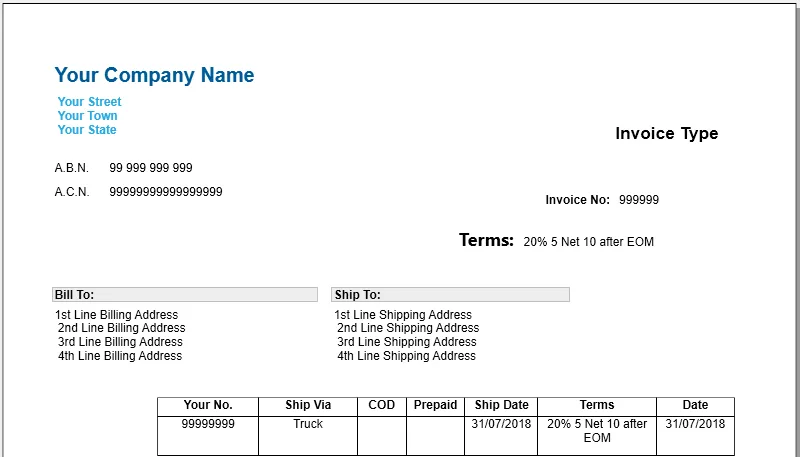
Click Print Preview to view your handy work.


To use your customised invoice when printing or emailing
You've made the effort to personalise an invoice, so here's how to use it when printing or emailing.
Saving invoices
To save an invoice as a PDF, open the invoice, click Send To > Disk, then choose where you want to save the PDF.

To print an invoice when you record it:
Click Print then choose Select Another Form.
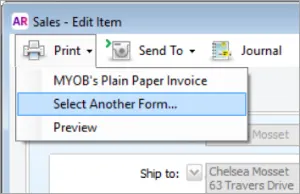
Select your customised invoice.
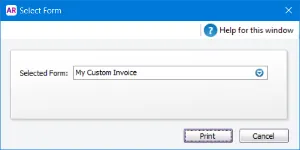
Click Print.


To email an invoice when you record it:
Click Send To and choose Email.
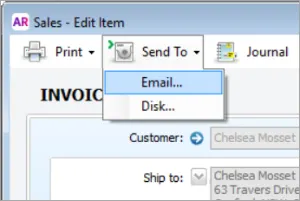
In the Selected Form field, select your customised invoice.
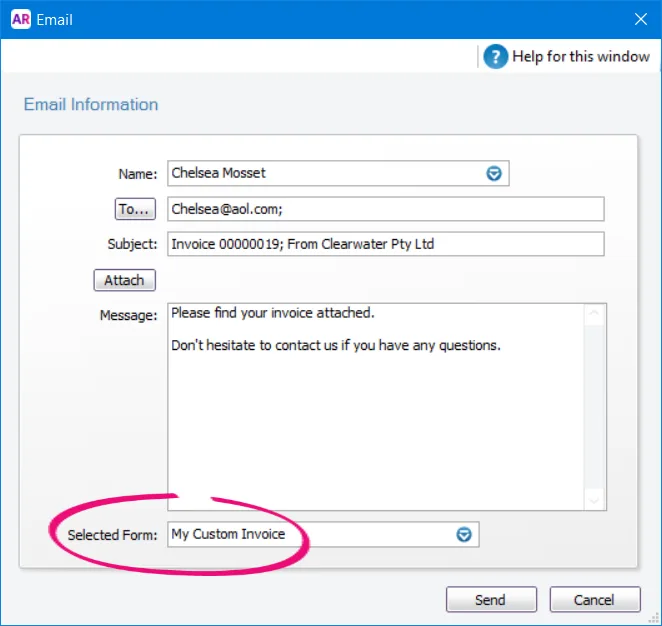
Click Send.


To print or email an invoice after you record it:
Select the form you want to use via the Advanced Filters on the Print/Email Invoices window.

For all the details, see Set the default forms to use when emailing or printing.
Can't see your customised invoice?
Check that you've customised the correct invoice form type. For example, if you're emailing or printing an item invoice (using the Item layout), only item invoice forms will be available for use.
To set a customer's default invoice form
If you have different invoice forms for different customers, you can set the default form to use in the customer's card. To set the default form to use for all customers, see Set the default forms to use when emailing or printing.
To set a customer's default form
Go to the Card File command centre and click Cards List.
Click the Customer tab.
Click the zoom arrow to open the customer's card.
Click the Selling Details tab.
In the Printed Form field, select the customised invoice for this customer.

If you can't see your customised form, make sure the applicable Sale Layout is selected.Click OK.

FAQs
How do I show the currency code on my invoices?
If you're using multi-currency in AccountRight Premier, you'll want to show the currency code on your invoices.
To do this, add the [Currency Code] data field and a text field to show "Amounts in" (or similar). Learn more about adding text and fields to forms.
Here's our example:
