The easiest way to work with bank transactions is to set up bank feeds, which saves you a huge amount of time on data entry.
But if you haven't set up bank feeds for any of your bank or credit card accounts, you can import an electronic bank statement instead. This lets you create rules and work with the bank transactions in a similar way you would if you had bank feeds.
If you've set up a bank feed, you don't need to import statements unless you want to import bank transactions from before your bank feed was activated.
Downloading statements from your bank
Before you can import a bank statement, you'll need to download it from your internet banking website. Save the bank statement as a .QIF or .OFX file, and if you have a choice of date formats, choose dd/mm/yy. Bank statement files must be less than 10MB.
Check your bank's website for more information on downloading bank statements, or speak to your bank.
Tips for importing statements:
You don't need to import statements in date order. You can import statements from earlier or later than the last one imported.
If you're importing several months’ worth of statements, it's best to import and reconcile them one month at a time. This will make it easier to manage a large backlog of transactions.
You can't import transactions that are dated earlier than the Opening balance month set in your Business settings.
Set up rules to automate a lot of manual data entry.
To import a bank or credit card statement
Once you’ve downloaded the electronic statements from your online banking website, you can import them into MYOB on the Bank transactions page.
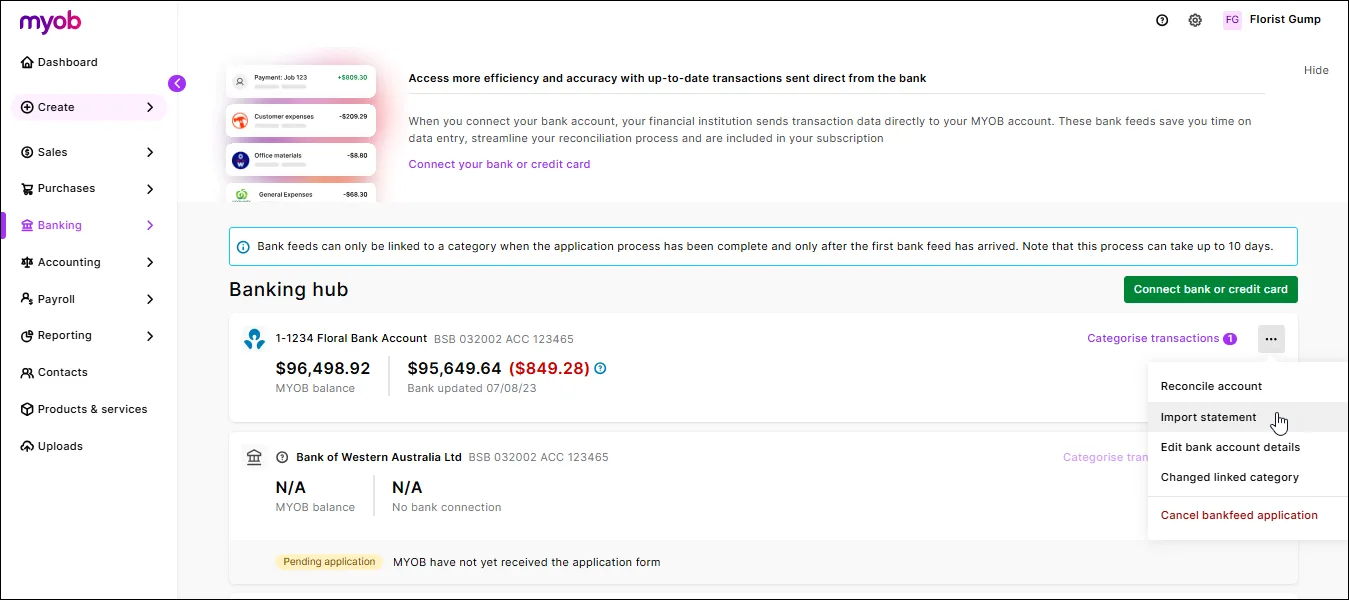
Go to the Banking menu and choose Banking hub.
For the account you want to import a statement for, click the three dots (...) and choose Import statement.
In the Bank statement import history page, click Import statement.
Choose the Bank account you want the imported transactions to go into.
Click Import statement file. The Import statement file page appears.
Click Browse. The Open window appears.
Select the statement file you want to import and click Open.
Click Import. The Bank statement import history window reappears, showing the statement file you chose and a message appears at the top of the screen, telling you how many statement lines were imported successfully. Imported transactions will show on the Bank transactions page.
If you want to:
import more statements into this or other account, repeat from step 2.
work with the transactions you just imported, see Working with bank transactions.

FAQs
I've imported a bank statement and now I have duplicated transactions in MYOB - what can I do?
This can occur if you've imported a bank statement which includes transactions which have already been brought into MYOB via bank feeds.
To fix this:
Download a new bank statement from your bank, ensuring the date range doesn't include transactions already in MYOB.
Import the new bank statement as described above.
My statement import was successful but zero transactions were imported - why?
Transaction won't be imported if they're:
dated before the Opening balance date set in MYOB, or
dated before a lock date that's been set in MYOB.
To check these details in MYOB, click your business name and choose Business settings. In the Financial year section you'll see the Opening balance date that's set in your file.

Below that in the Lock date section, you'll see if a lock date has been set which prevents transactions being entered (or imported) before that date.

Learn more about your Business settings and Locking transactions.
If you haven't set up bank feeds to automatically bring your bank transactions into AccountRight, you can import bank statements downloaded from your bank. It's a bit slower than using bank feeds, but the end result is the same.
Downloading statements from your bank
Before you can import a bank statement, you'll need to download it from your internet banking website. Save the bank statement as a .QIF or .OFX file, and if you have a choice of date formats, choose dd/mm/yy. Bank statement files must be less than 10MB.
Check your bank's website for more information on downloading bank statements, or speak to your bank.
Tips for importing statements:
You don't need to import statements in date order. You can import statements from earlier or later than the last one imported.
If you're importing several months’ worth of statements, it's best to import and reconcile them one month at a time. This will make it easier to manage a large backlog of transactions.
You can't import transactions that are dated earlier than the Conversion Month that was set when you created your company file.
Set up rules to automate a lot of manual data entry.
To import a bank statement
Download the statement file from your bank. Your bank’s website should provide instructions on how to download this file, or speak to your bank. The following file formats are supported: OFX, QFX, QIF and OFC. Take note of where you save the downloaded statement.
Go to the Banking command centre and click Reconcile Accounts. The Reconcile Accounts window appears.
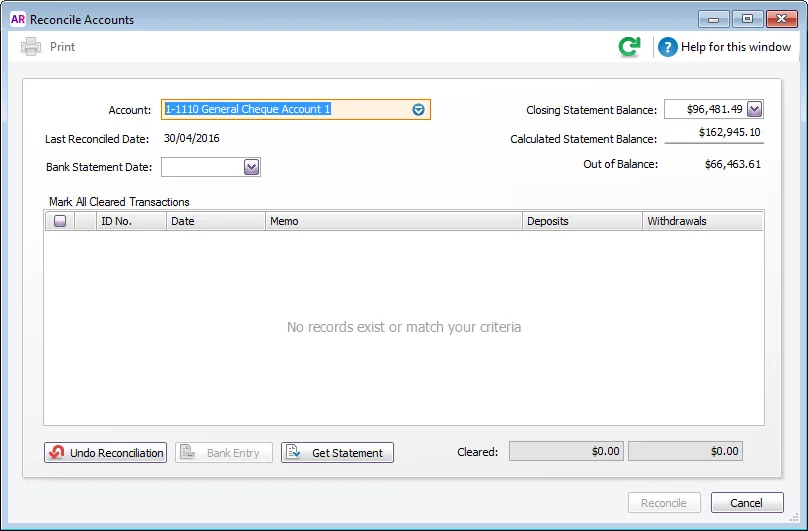
In the Account field, enter the account you want to reconcile.
In the Closing Statement Balance field, type the closing balance that appears on the statement your bank sent you.
In the Bank Statement Date field, enter the closing date that appears on your bank statement and then press Tab. Only unreconciled transactions dated on or before that date will appear.
Click Get Statement. The Select a Bank Statement file window appears.
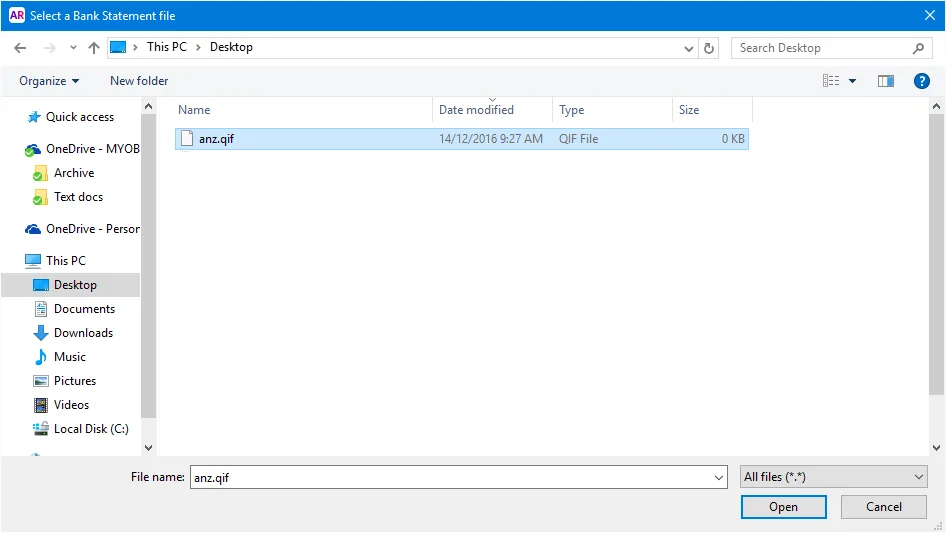
Locate and select the statement file you downloaded in step 1.
Click Open. The Get Statement window appears.
Click OK. The statement transactions are automatically matched with the transactions in your company file using the cheque number, date and amount as the criteria for matching withdrawals and deposits.
If the Unmatched Statement Transactions window appears, choose what you want to do for each unmatched transaction:
Match: If you've already entered a transaction that matches a statement transaction, select the statement transaction and click Match Transaction. In the Match Transaction window, select the transaction that you want to match and click Match.
Add: If you want to add the statement transaction to your company file (spend money or receive money only), select it and click Add Transaction. The Spend Money window or the Receive Money window (depending on the type of transaction you're adding) appears. Enter the details of the transaction and record it.
When you have finished matching and adding all statement transactions, click Done. The Reconcile Accounts window appears.


Need to enter a different transaction type?
If you need to add a different type of transaction, such as a receive payment or pay bills, right-click anywhere on the Unmatched Statement Transactions window and choose Enter Transactions then choose the type of transaction you want to enter. Once you've recorded the transaction, you can then Match it on the Unmatched Statement Transactions window.